PDF factsheet
This information is available as a handy PDF for you to download and keep.
Creating PDFs for print
It's possible to create PDFs in an almost infinite number of different ways, for a number of different purposes - fast download and emailing, printing locally on your office computer. Making PDFs for print requires a little foresight and knowledge.
Fonts
All fonts should be embedded in the PDF and ideally they should not be subsetted.
Pictures and Graphics
All pictures should be 300ppi (dots or pixels per inch) or greater when used at 100% size. Remember, a 300dpi picture scaled to 200% now has an effective resolution of 150dpi and will no longer be acceptable. Lower resolutions such those used for soft shadows will probably look OK, but areas of sharp contrast will start to show jaggy edges.
Colour
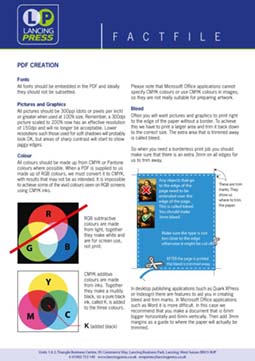
All colours should be made up from CMYK or spot Pantone colours where possible. When a PDF is supplied to us made up of RGB colours, we must convert it to CMYK first, with results that may not be as you envisaged.
Computer design uses RGB
Colours on computers use RGB, red green and blue. Mixed togther in proportions they make all the other colours. This is called subtractive colour. Addition of another colour bleaches out the colour.
in total combination they make white. RGB colours are for screen use, not print.

Printing presses use CMYK inks
CMYK additive colours are made from inks, which in turn are made from ground up solid pigments and a liquid binder. Due to impuities in the colour together they can only make a muddy black, so an additional pure black ink, called K, is added to the three colours. It is called K because black 'keys' the other colours, oftne holding them within keylines. K is an abbreviation for 'key'.
It is simply not physically possible to achieve some of the vivid colours seen on RGB screens using CMYK inks.

Microsoft Office applications cannot specify CMYK colours or import CMYK colours in images and this is why they are not suitable for preparing artwork for print
Bleed
Often you will want pictures and graphics to print right to the edge of the paper without a border. To achieve this we have to print a larger area and trim the paper back down to the correct size. The extra area that is trimmed away is called bleed.
So when you need a borderless print job you should make sure that there is an extra 3mm on all edges for us to trim away.
Bleed & trims

In desktop publishing applications (such as Quark XPress or Indesign) there are features to aid you in creating bleed and trim marks. In Microsoft Office applications such as Word it is more difficult. In this case we recommend that you make a document that is 6mm bigger horizontally and 6mm vertically. Then add 3mm margins as a guide to where the paper will actually be trimmed.